Gravel driveways are a popular choice for many homeowners due to their affordability, ease of installation, and rustic aesthetic. However, proper preparation is crucial to ensure the longevity and functionality of your gravel driveway. In this comprehensive guide, we’ll walk you through the essential steps to prepare your driveway for gravel installation, ensuring you achieve a durable and attractive result.
Understanding the Basics of Gravel Driveways
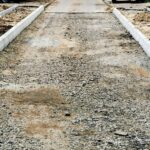
Gravel driveways consist of multiple layers of gravel, with each layer serving a specific purpose. Typically, a gravel driveway has three layers: a base layer, a middle layer, and a top layer. Proper preparation involves ensuring that each layer is laid correctly to provide a stable and well-draining surface.
Why Choose a Gravel Driveway?
Gravel driveways offer several benefits, including:
- Cost-effectiveness: Gravel is significantly cheaper than asphalt or concrete.
- Ease of maintenance: Gravel driveways are relatively easy to maintain and repair.
- Aesthetic appeal: Gravel provides a classic and rustic look that enhances curb appeal.
Step 1: Planning and Designing Your Gravel Driveway
Before you begin the physical preparation, take the time to plan and design your driveway. Consider the following aspects:
Determine the Driveway Location and Size
Survey your property to decide the best location for your driveway. Consider factors such as drainage, accessibility, and proximity to your home. Measure the length and width of the desired driveway area to calculate the amount of gravel needed.
Obtain Necessary Permits
Check with your local city or county offices to determine if you need any permits or approvals for your driveway project. Ensuring compliance with local regulations is essential to avoid legal issues later on.
Choose Your Gravel
Select the types of gravel you will use for each layer of your driveway. Typically, the base layer consists of larger stones, the middle layer of medium-sized gravel, and the top layer of smaller gravel or decorative stones.
Step 2: Clearing and Excavating the Driveway Area
Proper site preparation is critical for a stable and durable gravel driveway.
Remove Debris and Vegetation
Clear the driveway area of any debris, grass, and topsoil. This can be done using a shovel, wheelbarrow, or even a backhoe for larger areas. Ensure the driveway surface is clean and free of any obstacles.
Excavate the Area
Excavate the driveway area to a depth of at least 8-12 inches, depending on the desired thickness of your gravel layers. The depth should be sufficient to accommodate the base, middle, and top layers of gravel. A minimum of 50mm should be left for the gravel, and 150mm for the sub-base if you plan on including one.
Step 3: Grading and Compacting the Soil
Level the Surface
Use a metal rake or grading tool to level the excavated area. This step is crucial to prevent water pooling and to ensure even gravel distribution. For decorative purposes, clear the surface, flatten it, and use a weed barrier or weed-suppressing membrane to prevent weed growth. Lay your chosen gravel on top, adjusting it to achieve your desired look.
Compact the Soil
Use a mechanical compactor or a heavy roller to compact the soil. This provides a stable foundation for the gravel layers and prevents future settling.
Step 4: Installing the Gravel Layers
Base Layer
Using #2 Limestone gravel, which is most commonly used as the base for gravel driveways, spread the base layer of large, angular gravel (typically 2-3 inches in diameter) evenly across the new driveway area. Use a shovel or wheelbarrow for distribution, and then compact the layer using a mechanical compactor.
Middle Layer
Next, spread the middle layer of medium-sized gravel (about 1-2 inches in diameter) over the compacted base layer. Compact this layer as well to ensure stability and prevent shifting.
Top Layer
Finally, spread the top layer of smaller gravel (3/8 inch to 1 inch in diameter) or decorative stones. This layer provides the finished look and smooth surface for your driveway. Compact this layer thoroughly to create a firm and even surface.
Step 5: Creating Borders and Finishing Touches
Install Borders
Consider adding borders along the edges of your driveway using bricks, landscape edging, or timber. This helps to keep the gravel contained and adds a polished look to the driveway.
Final Compaction
Perform a final compaction of the entire driveway to ensure all layers are firmly packed and even. This step is essential for the longevity and durability of your gravel driveway.
Maintenance Tips for Gravel Driveways
Regular maintenance is key to preserving the appearance and functionality of your gravel driveway. Here are some tips:
- Replenish Gravel: Over time, gravel may disperse or settle. Add new gravel as needed to maintain the desired thickness and appearance.
- Weed Control: Periodically check for weeds and remove them promptly to prevent them from spreading.
- Regular Grading: Use a rake or grading tool to level the surface and redistribute gravel as necessary.
- Inspect for Damage: Regularly inspect your driveway for potholes or low spots and fill them with fresh gravel to maintain an even surface.
For professional assistance with your gravel driveway project, consider hiring a reliable residential paving company. JR Paving & Construction Co Inc offers expert gravel driveway installation and maintenance services to ensure your driveway looks great and lasts for years.
Contact JR Paving & Construction Co Inc today at (888) 497-3391 to discuss your project and get a free quote. Our experienced team is ready to help you create a beautiful and durable gravel driveway tailored to your needs.
Achieve a flawless gravel driveway with the help of JR Paving & Construction Co Inc. Our expertise and dedication to quality ensure a driveway that enhances your property’s curb appeal and functionality.